You will find the solution for every Error : HINT (XXXX) from below :-
ERROR : HINT (S0305): https://my.vertica.com/docs/7.1.x/HTML/index.htm#cshid=S0305
TZ is unset for dbadmin. Consider updating .profile or .bashrc
REFRENCE : http://www.ibm.com/developerworks/library/l-cpufreq-2/
ERROR S0305 SOLUTION :-
GO TO
root@storage ~]# vi /home/dbadmin/.bash_profile
AND ADD FOLLOWING
export TZ=”America/New_York”
———————————————————————————- ———————————————————————————-
HINT (S0041): https://my.vertica.com/docs/7.1.x/HTML/index.htm#cshid=S0041
Could not find the following tools normally provided by the mcelog
package: mcelog
HINT (S0041) SOLUTION :
On RedHat based systems, run the following commands as sudo or root:
yum install pstack
yum install mcelog
yum install sysstat
——————————————————————————————————————————————————————–
WARN (S0160): https://my.vertica.com/docs/7.1.x/HTML/index.htm#cshid=S0160
These disks do not have ‘ext3’ or ‘ext4’ filesystems: ‘/dev/sda1’ =
‘vfat’
WARN (S0160) SOLUTION :
——————————————————————————————————————————————————————–
FAIL (S0150): https://my.vertica.com/docs/7.1.x/HTML/index.htm#cshid=S0150
These disks do not have ‘deadline’ or ‘noop’ IO scheduling: ‘/dev/sda6’
(‘sda’) = ‘cfq’, ‘/dev/sda5’ (‘sda’) = ‘cfq’, ‘/dev/sda7’ (‘sda’) =
‘cfq’, ‘/dev/sda9’ (‘sda’) = ‘cfq’, ‘/dev/sda8’ (‘sda’) = ‘cfq’,
‘/dev/sda4’ (‘sda’) = ‘cfq’, ‘/dev/sda1’ (‘sda’) = ‘cfq’, ‘/dev/sda2’
(‘sda’) = ‘cfq’, ‘/dev/sda3’ (‘sda’) = ‘cfq’
FAIL (S0150) SOLUTION :
——————————————————————————————————————————————————————–
WARN (S0141): https://my.vertica.com/docs/7.1.x/HTML/index.htm#cshid=S0141
CPUs have discouraged cpufreq scaling policies: cpu0, cpu1, cpu2, cpu3
WARN (S0141) SOLUTION :
The only reliable method is to disable CPU scaling in BIOS.
CHECKING CPU INFORMATION
[root@storage cpufreq]# grep -E ‘^model name|^cpu MHz’ /proc/cpuinfo
model name : Intel(R) Core(TM) i5-3230M CPU @ 2.60GHz
cpu MHz : 1200.000
model name : Intel(R) Core(TM) i5-3230M CPU @ 2.60GHz
cpu MHz : 1200.000
model name : Intel(R) Core(TM) i5-3230M CPU @ 2.60GHz
cpu MHz : 1200.000
model name : Intel(R) Core(TM) i5-3230M CPU @ 2.60GHz
cpu MHz : 1200.000
[root@storage cpufreq]#
[root@storage cpufreq]# uname -a
Linux storage.castrading.com 2.6.32-431.el6.x86_64 #1 SMP Sun Nov 10 22:19:54 EST 2013 x86_64 x86_64 x86_64 GNU/Linux
[root@storage cpufreq]#
2) Check that current cpu speed differs from the maximum:
# grep -E ‘^model name|^cpu MHz’ /proc/cpuinfo
[root@storage cpufreq]# service cpuspeed start
Enabling ondemand cpu frequency scaling: [ OK ]
[root@storage cpufreq]# lsmod | grep ondemand
cpufreq_ondemand 10544 4
freq_table 4936 2 cpufreq_ondemand,acpi_cpufreq
[root@storage cpufreq]#
REFER URL : http://www.servernoobs.com/avoiding-cpu-speed-scaling-in-modern-linux-distributions-running-cpu-at-full-speed-tips/
——————————————————————————————————————————————————————–
FAIL (S0150): https://my.vertica.com/docs/7.1.x/HTML/index.htm#cshid=S0150
These disks do not have ‘deadline’ or ‘noop’ IO scheduling: ‘/dev/sda6’
(‘sda’) = ‘cfq’, ‘/dev/sda5’ (‘sda’) = ‘cfq’, ‘/dev/sda7’ (‘sda’) =
‘cfq’, ‘/dev/sda9’ (‘sda’) = ‘cfq’, ‘/dev/sda8’ (‘sda’) = ‘cfq’,
‘/dev/sda4’ (‘sda’) = ‘cfq’, ‘/dev/sda1’ (‘sda’) = ‘cfq’, ‘/dev/sda2’
(‘sda’) = ‘cfq’, ‘/dev/sda3’ (‘sda’) = ‘cfq’
FAIL (S0150) SOLUTION :
RedHat and SuSE Based Systems
For each drive in the HP Vertica system, HP Vertica recommends that you set the readahead value to 2048 for most deployments.
The command immediately changes the readahead value for the specified disk. The second line adds the command to /etc/rc.local so
that the setting is applied each time the system is booted. Note that some deployments may require a higher value and the setting can
be set as high as 8192, under guidance of support.
Note: For systems that do not support /etc/rc.local, use the equivalent startup script that is run after the destination runlevel has been reached.
For example SuSE uses /etc/init.d/after.local.
[root@storage cpufreq]# /sbin/blockdev –setra 2048 /dev/sda
[root@storage cpufreq]# echo ‘/sbin/blockdev –setra 2048 /dev/sda’ >> /etc/rc.local
[root@storage cpufreq]#
——————————————————————————————————————————————————————–
FAIL (S0030): https://my.vertica.com/docs/7.1.x/HTML/index.htm#cshid=S0030
ntpd process is not running: [‘ntpd’, ‘ntp’]
FAIL (S0030) SOLUTION :
For RedHat and SuSE based systems, simply use the service and chkconfig utilities to start NTP and have it start at boot time.
[root@storage cpufreq]# /sbin/chkconfig ntpd on
[root@storage cpufreq]# /sbin/service ntpd restart
Shutting down ntpd: [ OK ]
Starting ntpd: [ OK ]
[root@storage cpufreq]#
——————————————————————————————————————————————————————–
FAIL (S0310): https://my.vertica.com/docs/7.1.x/HTML/index.htm#cshid=S0310
Transparent hugepages is set to ‘always’. Must be ‘never’ or ‘madvise’.
FAIL (S0310) SOLUTION :
RedHat Systems
To determine if transparent hugepages is enabled, run the following command. The setting returned in brackets is your current setting.
[root@storage cpufreq]# cat /sys/kernel/mm/redhat_transparent_hugepage/enabled
[always] madvise never
Edit your boot loader (for example /etc/grub.conf), typically you add the following to the end of the kernel line. However, consult the documentation for your system before editing your boot loader configuration.
transparent_hugepage=never
[root@storage cpufreq]# vi /etc/grub.conf
[root@storage cpufreq]# echo never > /sys/kernel/mm/redhat_transparent_hugepage/enabled
——————————————————————————————————————————————————————–
FAIL (S0081) SOLUTION :
Edit /etc/selinux/config
setenforce 0
——————————————————————————————————————————————————————–
FAIL (S0150): https://my.vertica.com/docs/7.1.x/HTML/index.htm#cshid=S0150
These disks do not have ‘deadline’ or ‘noop’ IO scheduling: ‘/dev/sda6’
(‘sda’) = ‘cfq’, ‘/dev/sda5’ (‘sda’) = ‘cfq’, ‘/dev/sda7’ (‘sda’) =
‘cfq’, ‘/dev/sda9’ (‘sda’) = ‘cfq’, ‘/dev/sda8’ (‘sda’) = ‘cfq’,
‘/dev/sda4’ (‘sda’) = ‘cfq’, ‘/dev/sda1’ (‘sda’) = ‘cfq’, ‘/dev/sda2’
(‘sda’) = ‘cfq’, ‘/dev/sda3’ (‘sda’) = ‘cfq’
FAIL (S0150) ANSWER :
cat /sys/block/sda/queue/scheduler noop deadline [cfq]
http://www.aodba.com/en/blog/2015/02/24/hp-vertica-installation-failed-errors/
——————————————————————————————————————————————————————
WARN (S0141): https://my.vertica.com/docs/7.1.x/HTML/index.htm#cshid=S0141
CPUs have discouraged cpufreq scaling policies: cpu0, cpu1, cpu2, cpu3
WARN (S0141) SOLUTION :-
1002 uname -a
1003 pgrep -lf
1004 pgrep -flvx
1005 for CPUFREQ in /sys/devices/system/cpu/cpu*/cpufreq/scaling_governor; do [ -f $CPUFREQ ] || continue; echo -n performance > $CPUFREQ; done
1006 grep -E ‘^model name|^cpu MHz’ /proc/cpuinfo
1007 service cpuspeed stop
1008 rmmod cpufreq_ondemand acpi_cpufreq freq_table
1009 rmmod cpufreq_ondemand acpi_cpufreq freq_table
1010 lsmod | grep ondemand
1011 for CPUFREQ in /sys/devices/system/cpu/cpu*/cpufreq/scaling_governor; do [ -f $CPUFREQ ] || continue; echo -n performance > $CPUFREQ; done
1012 /opt/vertica/sbin/install_vertica -s storage.castrading.com -r /root/Downloads/vertica-7.1.1-0.x86_64.RHEL5.rpm -u dbadmin
——————————————————————————————————————————————————————
WARN (S0160): https://my.vertica.com/docs/7.1.x/HTML/index.htm#cshid=S0160
These disks do not have ‘ext3’ or ‘ext4’ filesystems: ‘/dev/sda1’ =
‘vfat’
WARN (S0160) SOLUTION : If you check /dev/sda1 TYPE from below then it is VFAT type, I need to convert VFAT TO EXT4 NOW
1 STEP :
[root@storage /]# df -T
Filesystem Type 1K-blocks Used Available Use% Mounted on
/dev/sda3 ext4 30237648 25919036 2782612 91% /
tmpfs tmpfs 1935272 880 1934392 1% /dev/shm
/dev/sda2 ext4 5039616 164920 4618696 4% /boot
/dev/sda1 vfat 4087992 264 4087728 1% /boot/efi
/dev/sda4 ext4 30237648 8515920 20185728 30% /home
/dev/sda8 ext4 15118728 684152 13666576 5% /opt
/dev/sda9 ext4 8063408 164468 7489340 3% /tmp
/dev/sda7 ext4 20158332 4023220 15111112 22% /usr
/dev/sda5 ext4 25197676 309188 23608488 2% /usr/local
/dev/sda6 ext4 25197676 513540 23404136 3% /var
NOTE : COPY /boot folder or take the backup of /boot folder
3RD STEP :
[root@storage ~]# mount | grep sda1
[root@storage ~]# umount /boot/efi/
[root@storage ~]# mkfs.ext4 /dev/sda1
mke2fs 1.41.12 (17-May-2010)
Filesystem label=
OS type: Linux
Block size=4096 (log=2)
Fragment size=4096 (log=2)
Stride=1 blocks, Stripe width=0 blocks
256000 inodes, 1024000 blocks
51200 blocks (5.00%) reserved for the super user
First data block=0
Maximum filesystem blocks=1048576000
32 block groups
32768 blocks per group, 32768 fragments per group
8000 inodes per group
Superblock backups stored on blocks:
32768, 98304, 163840, 229376, 294912, 819200, 884736
Writing inode tables: done
Creating journal (16384 blocks): done
Writing superblocks and filesystem accounting information: done
This filesystem will be automatically checked every 23 mounts or
180 days, whichever comes first. Use tune2fs -c or -i to override.
[root@storage ~]# mount /dev/sda1 /boot/efi/
[root@storage ~]#
NOTE : SIMPLY COPY AND PASTE THE BOOT FOLDER
AND RUN THE VERTICA SCRIP AGAIN :-
[root@storage ~]# /opt/vertica/sbin/install_vertica -s storage.castrading.com -r /root/Downloads/vertica-7.1.1-0.x86_64.RHEL5.rpm -u dbadmin
——————————————————————————————————————————————————————-
FAIL (S0150): https://my.vertica.com/docs/7.1.x/HTML/index.htm#cshid=S0150
These disks do not have ‘deadline’ or ‘noop’ IO scheduling: ‘/dev/sda1’
(‘sda’) = ‘cfq’, ‘/dev/sda6’ (‘sda’) = ‘cfq’, ‘/dev/sda5’ (‘sda’) =
‘cfq’, ‘/dev/sda7’ (‘sda’) = ‘cfq’, ‘/dev/sda9’ (‘sda’) = ‘cfq’,
‘/dev/sda8’ (‘sda’) = ‘cfq’, ‘/dev/sda4’ (‘sda’) = ‘cfq’, ‘/dev/sda2’
(‘sda’) = ‘cfq’, ‘/dev/sda3’ (‘sda’) = ‘cfq’
FAIL (S0150) SOLUTION :
Vertica requires either deadline or noop I/0 scheduler. And CFQ creates performance bottlenecks.
Permanent setting can be done by adding the following in kernel cmd line in vim /etc/grub.conf
elevator=deadline
Configure the I/O Scheduler – Changing the Scheduler Through the /sys Directory
- Check the current status:
$ cat /sys/block/sda/queue/scheduler
noop anticipatory deadline [cfq]
- Change for the current run:
$ echo deadline > /sys/block/sda/queue/scheduler
- Add the change to rc.local so it survives reboot:
$ echo ‘echo deadline > /sys/block/sda/queue/scheduler’ >> /etc/rc.local
$ cat /sys/block/sda/queue/scheduler
noop anticipatory [deadline] cfq
$ find / -iname “scheduler”
Ok, we have sda device. You can confirm it by: blkid command or fdisk -l
NOTE: There should not be any LVM partitions associated with vertica
Make the change to /dev/mapper/VolGroup-lv_root as well
so Check the dev device name for partition like /dev/mapper/VolGroup-lv_root, lvdisplay -v or ll /dev/VolGroup/
In my case it is -> Block device 253:0s
Unable to resolve this one as LVM was used and had to reinstall my OS with EXT4
[root@storage ~]# /opt/vertica/sbin/install_vertica -s storage.castrading.com -r /root/Downloads/vertica-7.1.1-0.x86_64.RHEL5.rpm -u dbadmin
——————————————————————————————————————————————————————-
FAIL (S0310): https://my.vertica.com/docs/7.1.x/HTML/index.htm#cshid=S0310
Transparent hugepages is set to ‘always’. Must be ‘never’ or ‘madvise’.
FAIL (S0310) SOLUTION :
To determine if transparent hugepages is enabled, run the following command. The setting returned in brackets is your current setting.
FIRST — cat /sys/kernel/mm/redhat_transparent_hugepage/enabled
[always] madvise never
You can disable transparent hugepages one of two ways:
SECOND –Edit your boot loader (for example /etc/grub.conf), typically you add the following to the end of
the kernel line. However, consult the documentation for your system before editing your boot loader
configuration.
transparent_hugepage=never
NOTE : YOU CAN FOLLOW ANY ONE FROM SECOND AND THIRD STEPS
THIRD — Or, edit /etc/rc.local and add the following script.
Note: For systems that do not support /etc/rc.local, use the equivalent startup script that is run after the destination runlevel has been reached. For example SuSE uses /etc/init.d/after.local.
if test -f /sys/kernel/mm/redhat_transparent_hugepage/enabled; then
echo never > /sys/kernel/mm/redhat_transparent_hugepage/enabled
fi
NOTE : You must reboot your system for the setting to take effect, or
run the following two echo lines to proceed with the install without rebooting:
echo never > /sys/kernel/mm/redhat_transparent_hugepage/enabled
[root@storage etc]# opt/vertica/sbin/install_vertica -s storage.castrading.com -r /root/Downloads/vertica-7.1.1-0.x86_64.RHEL5.rpm -u dbadmin
===================================================================================================
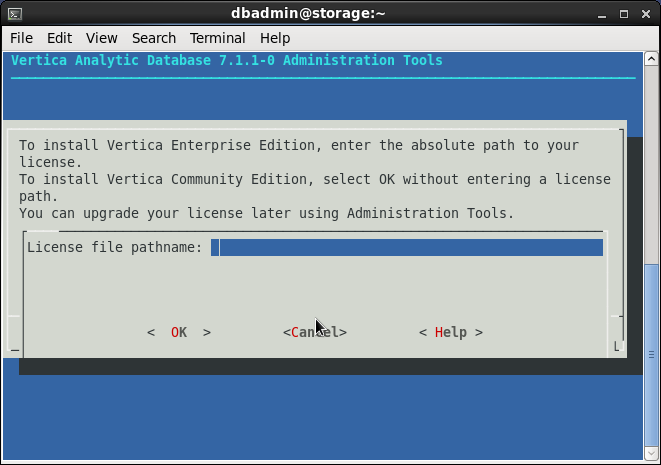
Please evaluate your hardware using Vertica’s validation tools:
https://my.vertica.com/docs/7.1.x/HTML/index.htm#cshid=VALSCRIPT